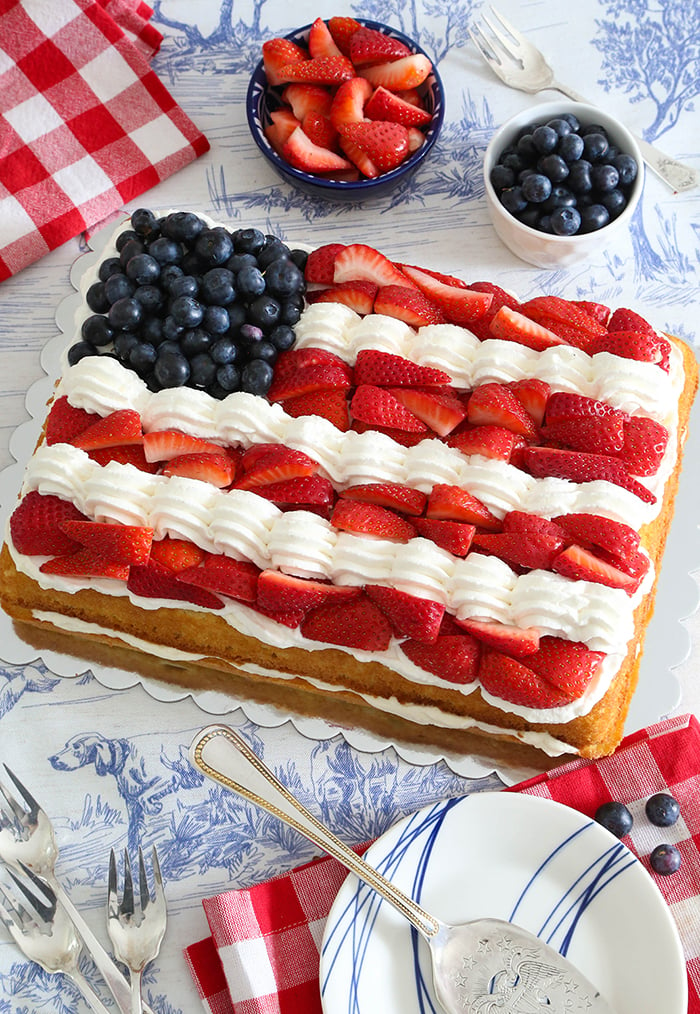
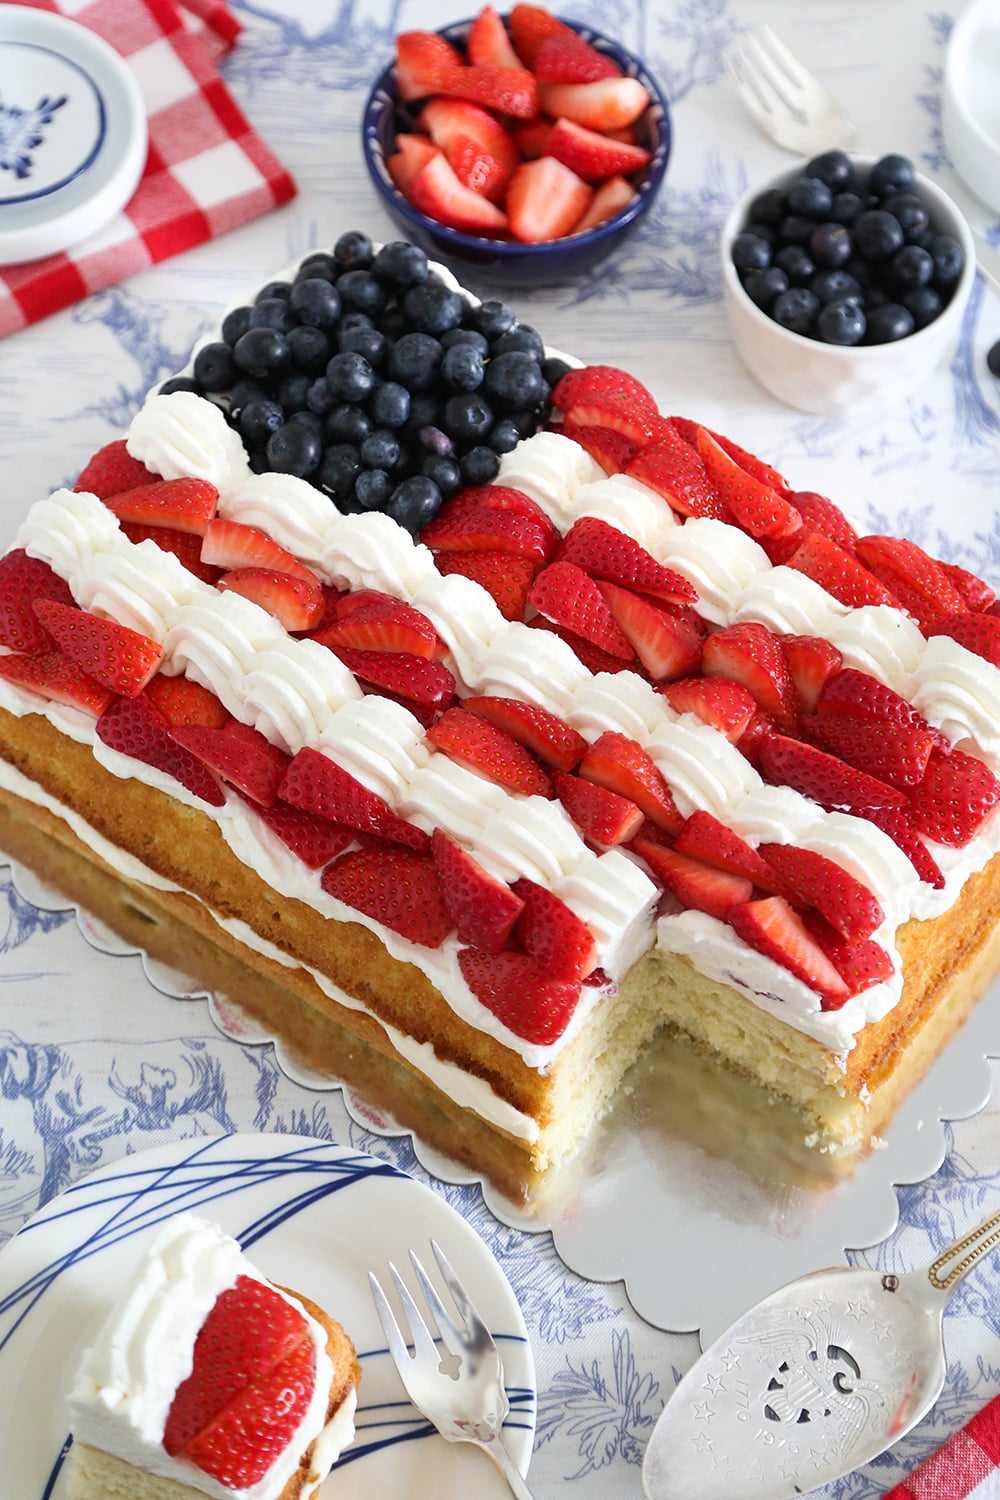
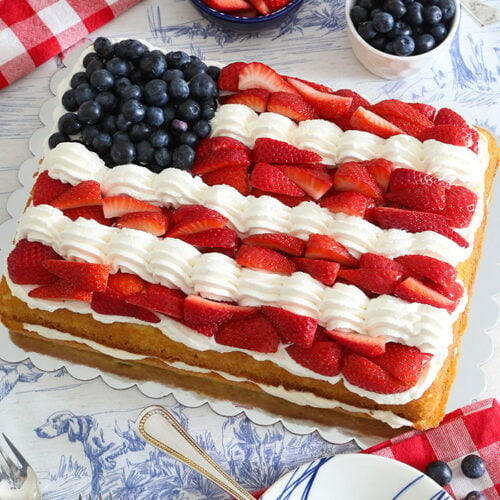
This American Flag Buttermilk Sheet Cake is made with two fluffy buttermilk cake layers, whipped cream cheese frosting, and fresh summer berries. Decorated to resemble the American flag, it’s an easy yet impressive cake for patriotic holidays and warm-weather entertaining.
If you’re looking for an easy, crowd-pleasing dessert for summer, this American Flag Buttermilk Sheet Cake could be your winner. In many ways, it reminds me of the classic New Orleans Chantilly cake, with its fluffy whipped frosting and all those fresh berries. But this version has an even more distinctly Southern twist with buttermilk in the cake layers and cream cheese in the whipped frosting. This gives the cake a tender crumb and the frosting just a little extra character. (We southerners call it ‘twang’.)
It’s also pretty unfussy. The cake layers are stacked with frosting in between with no need to frost the sides. The only flourish is the flag design on top, and even that is easier to create than it looks. A few rows of strawberries, a handful of blueberries, some piped frosting stripes, and you’re done.
American Flag Sheet Cake with Fresh Berries
This cake feels right at home on a Fourth of July dessert table, and it would be especially fitting as we approach America’s 250th anniversary. But don’t reserve it only for patriotic celebrations. During the dog days of summer, you can skip the flag motif altogether and scatter the berries over the top in whatever arrangement suits you.
Let’s jump in!
Make the Buttermilk Cake Batter
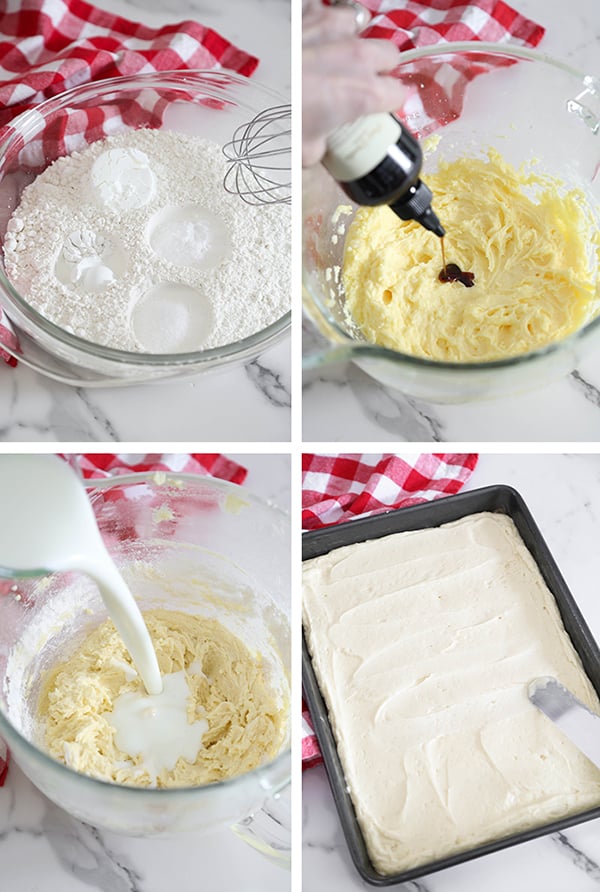
The buttermilk cake batter comes together using pantry staples and bakes up soft, fluffy, and sturdy enough for layering. Cream the butter and sugar until light and fluffy, then alternate the dry ingredients with buttermilk for a smooth, velvety batter.

Bake the Cake Layers
Divide the batter evenly between two 13×9-inch pans. Bake until lightly golden on top and a toothpick inserted in the center comes out clean, about 20 minutes. If you don’t have two pans, you can reuse one pan. Cover and refrigerate the cake batter while the first layer bakes. Then, wash and re-prep your pan for the next cake.
Allow the cakes to cool completely before assembling. Whipped cream cheese frosting is so meltable and will not be stable on a warm cake.
Whipped Cream Cheese Frosting Ingredients
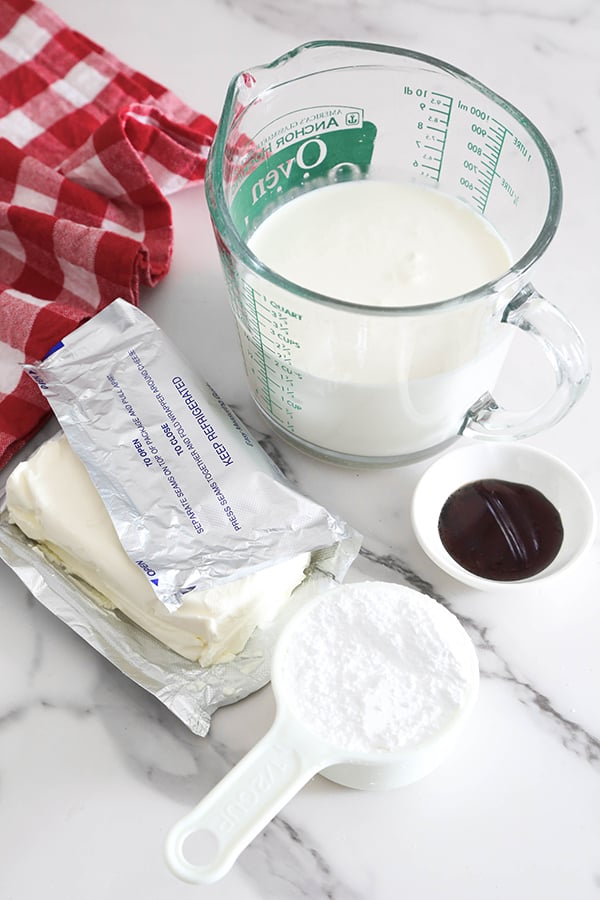
This whipped cream cheese frosting uses just four ingredients: cream cheese, confectioners’ sugar, heavy whipping cream, and vanilla bean paste. Start with cold cream cheese and cold heavy cream. This creates a frosting that’s smooth, fluffy, and sturdy enough for piping decorative stripes between the berries.
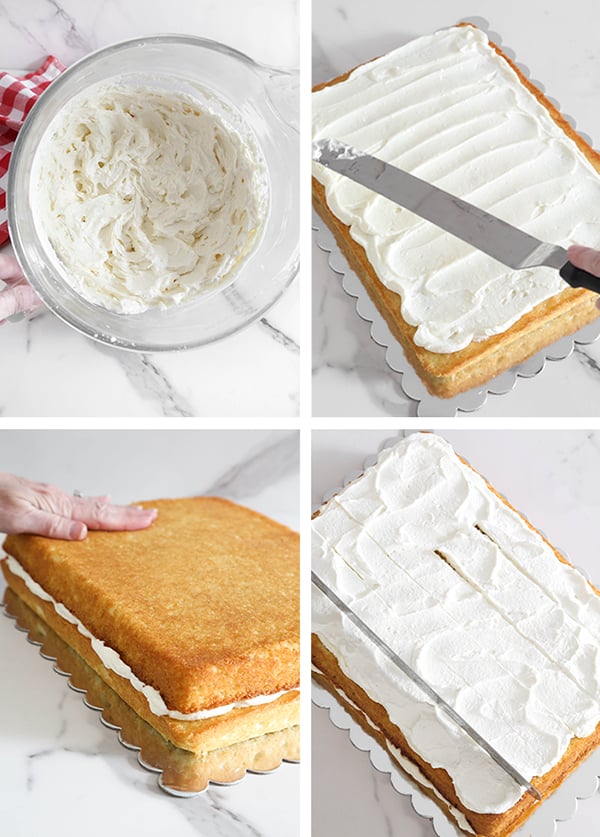
Assemble the Cake
Place one cake layer on a serving board or platter and spread a generous layer of whipped cream cheese frosting on top. Add the second cake layer and cover the top with more frosting.
Before adding the berries, lightly mark the flag design with a ruler, offset spatula, or toothpick if desired. This simple step makes arranging the strawberries and blueberries much easier and helps keep the rows straight.
Prep the Strawberries
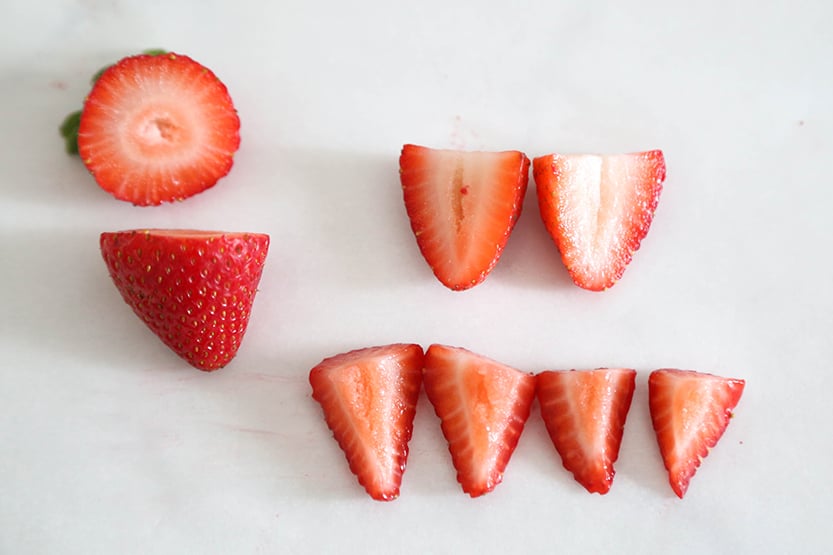
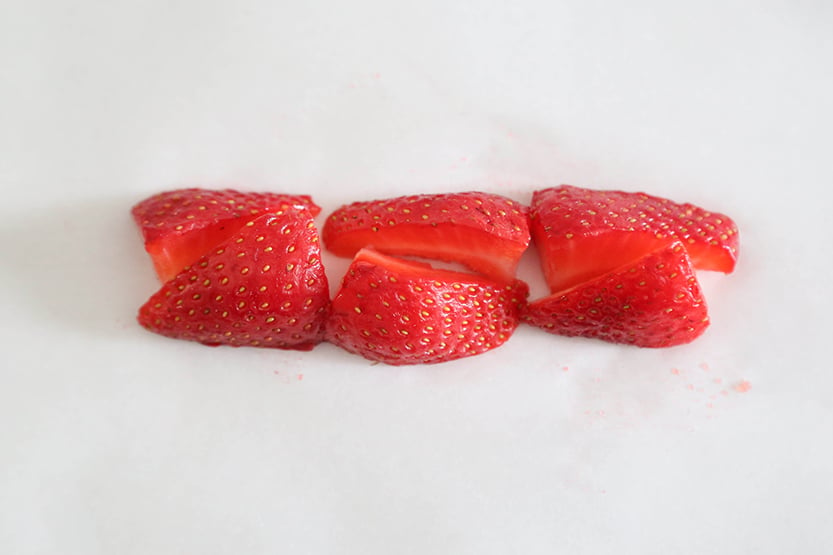
Cut the caps on of the berries and then slice them in half vertically. Slice them again into 1/4ths. If your berries are very large, you may even have to slice them into 1/8ths. The idea is to get slender pieces that can easily be arranged into the red stripes of the flag.
The image above shows how the first strawberry stripe should look. Arrange the strawberry quarters side by side, alternating the cap ends and pointed ends. Think of the way shoes are packed in a shoe box – toe to heel. This creates a straighter, more block-like stripe for the flag design.
Make an American Flag with Fresh Berries
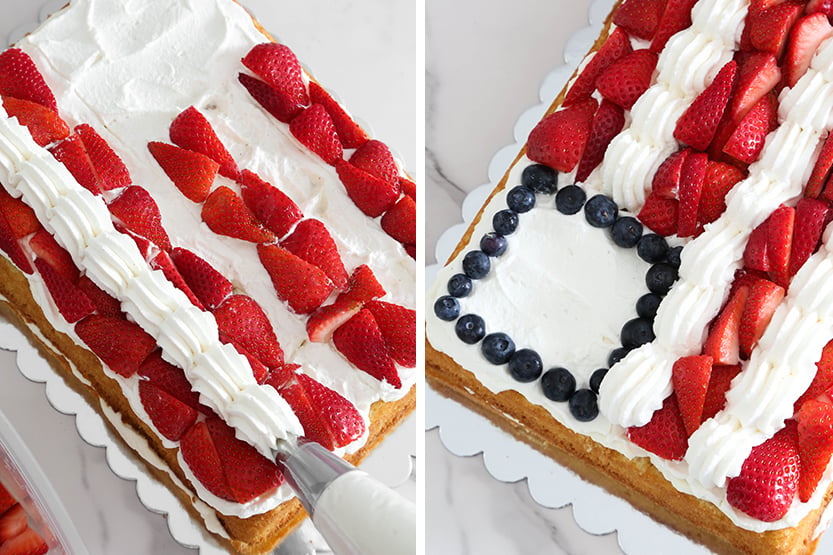
Arrange a single layer of the strawberries in horizontal rows across the cake to create the red stripes of the flag, leaving the upper left corner open for the blue field. Fill the open section with fresh blueberries.
Transfer the remaining whipped cream cheese frosting to a piping bag fitted with a large French pastry tip or large open star tip. Pipe rows of frosting between the strawberry stripes to create the white stripes of the flag. You can use a shell border pattern for added texture or pipe straight lines for a simpler look.
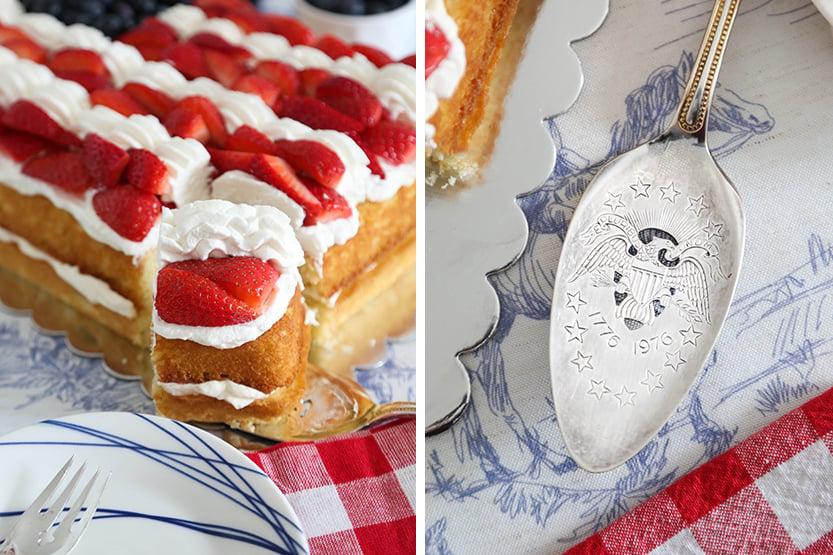
THEN (important) – go back and pile more strawberry quarters on top of the first layers of strawberries. This makes the cake look full and abundant. And who doesn’t love more strawberries? Aim to get the height of the berries somewhat even with the white stripes. Refrigerate the cake for about 30 minutes to firm the frosting before serving.

Make Ahead and Storage
- Because the frosting contains cream cheese and fresh whipped cream, this cake should be stored in the refrigerator.
- The cake layers can be baked up to 2 days in advance and refrigerated, tightly wrapped. For longer storage, freeze the cooled cake layers for up to 1 month. Thaw overnight in the refrigerator before assembling.
- Once decorated, the cake is best enjoyed within 1 to 2 days for the freshest berries and best texture.
When to Serve this Cake
This patriotic sheet cake is perfect for Memorial Day, Independence Day celebrations, Veterans Day, military homecomings, and summer cookouts. If you’re not inclined to fashion ‘Old Glory’ on top of the cake, simply pile on the whipped frosting and berries with a few mint sprigs. It’s good for any warm weather celebration.
Side note: I couldn’t resist using a vintage Bicentennial cake server that I found years ago. It’s so fitting for an American Flag Buttermilk Sheet Cake – right? Fifty years have passed since the nation’s 200th anniversary, but one thing remains the same: gratitude for the men and women who serve our country. Thank you to those who selflessly serve.
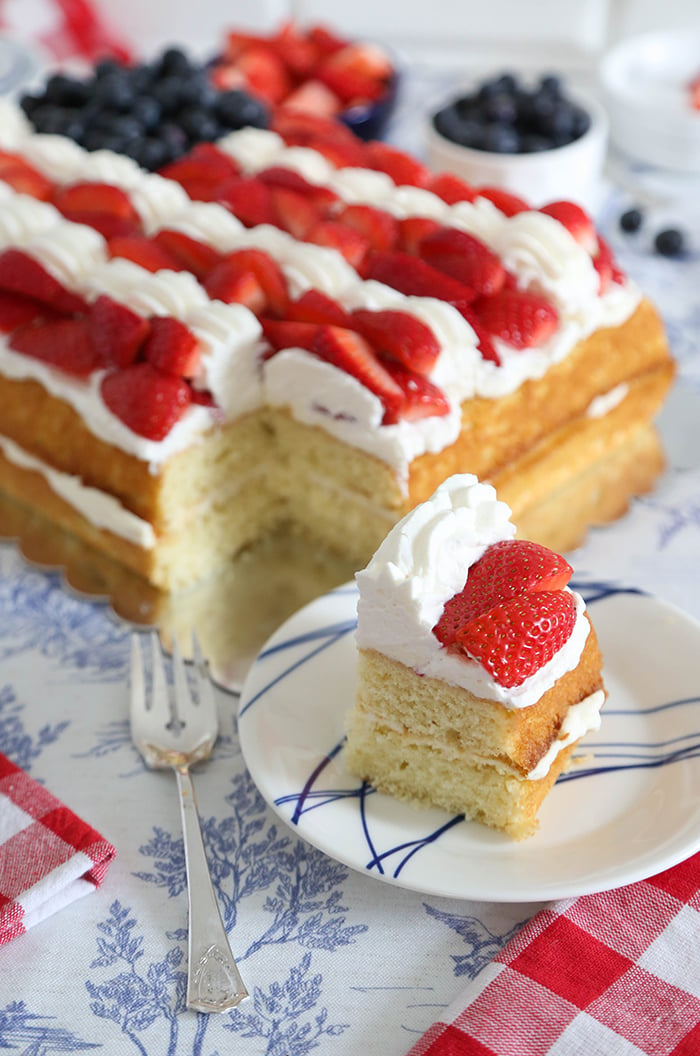
The Perfect Patriotic Sheet Cake for Summer
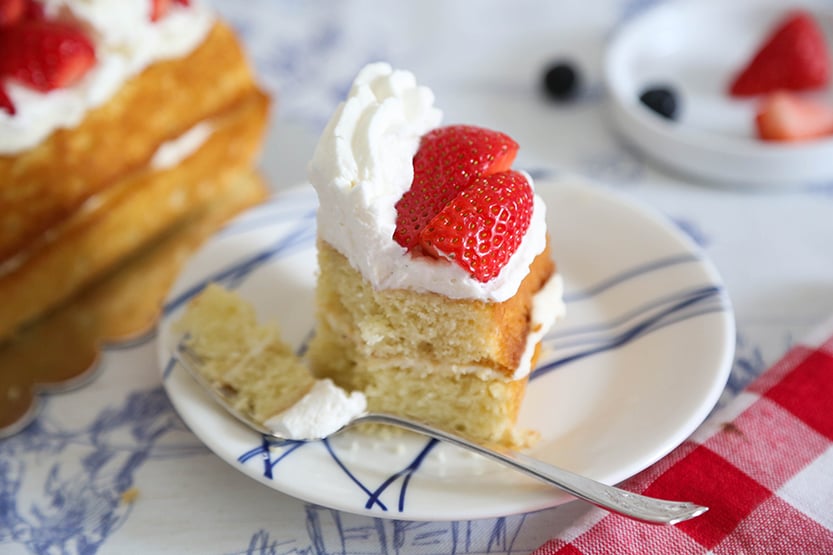
To me, this cake tastes like a cross between strawberry shortcake and chantilly cake – but also something that might come out of your Southern grandma’s kitchen. The soft buttermilk cake stays moist and flavorful, while the lightly sweetened whipped cream cheese frosting adds a cool, creamy contrast to the tart fruit. It’s been a real crowd-pleaser for us. I hope you’ll find it as convenient and dependable as I have. It’s one of those recipes I will return to again and again, especially during berry season.
Related recipe: American Flag Cake (with a Surprise Inside!)
American Flag Buttermilk Sheet Cake
Equipment
- 13×9 inch cake pans (2)
- disposable piping bag
- Large French piping tip such as Ateco 869
Ingredients
Buttermilk cake layers
- 2 2/3 cups all-purpose flour
- 1/4 cup cornstarch
- 1 1/2 teaspoons baking powder
- 1/2 teaspoon baking soda
- 1 teaspoon kosher salt
- 1 cup unsalted butter at room temperature
- 2 cups granulated sugar
- 3 large eggs at room temperature
- 1 teaspoon vanilla bean paste or vanilla extract
- 1 cup whole buttermilk
Whipped cream cheese frosting
- 8 oz. cream cheese cold
- 1/2 cup confectioners’ sugar
- 2 cups heavy whipping cream cold
- 1 tablespoon vanilla bean paste
Assembly
- 1 cup fresh blueberries
- 1 lb. strawberries capped and cut into quarters
Instructions
Buttermilk cake layers
- Preheat the oven to 350°F. Coat two 13×9 inch cake pans with flour-based baking spray (such as Baker’s Joy) or grease and flour the pans.
- In a large bowl combine the all-purpose flour, cornstarch, baking powder baking soda, and salt. Whisk to combine and set aside.
- In the bowl of an electric mixer, beat the butter and granulated sugar until light and fluffy, about 3 minutes. Beat in the eggs one at a time. When the yolk of one egg is completely incorporated, then add the next egg. Scrape down the bowl and add the vanilla bean paste or extract.
- Beat in 1/3 of the flour mixture, and then alternate with 1/2 of the buttermilk. Repeat with another 1/3 of the flour and the remaining buttermilk. Beat in the remaining 1/3 of flour until just incorporated.
- Divide the batter between the prepared baking pans and smooth evenly. Bake 20-22 minutes, or until lightly golden on top and a toothpick tester comes out clean. Cool in the pans for 10 minutes then turn out onto wire racks to cool completely before frosting.
Whipped cream cheese frosting
- Place a large mixing bowl and the whisk attachment of a stand mixer in the freezer for 20 to 30 minutes before beginning.
- Add the cold cream cheese to the chilled bowl and beat on medium speed until completely smooth and free of lumps, about 2-3 minutes.
- Add the confectioners’ sugar and vanilla. Mix on low speed until incorporated, then increase to medium speed and beat until smooth.
- With the mixer running on medium speed, add about 1/4 cup of the heavy cream and beat until smooth. Repeat with another 1/4 cup of cream. This helps create a smooth base and prevents small bits of cream cheese from remaining in the frosting.
- Gradually stream in the remaining heavy cream while mixing on medium-high speed.
- Continue whipping until the frosting thickens and holds medium-stiff peaks. Be careful not to overmix.
Assemble and decorate
- Place one cake layer on a cake board or serving plate. Spread 2 cups of the whipped cream cheese frosting on top. Top with the second cake layer. Spread about 1 to 1 1/2 cups of the whipped frosting on top of the cake, leaving the sides unfrosted. Transfer remaining whipped cream cheese frosting to a piping bag fitted with a large open star tip such as Ateco 869 (also called a French pastry tube).
- Arrange a single layer of strawberries on top of the cake in horizontal rows to create the red stripes of the flag, leaving a rectangle in the upper left corner uncovered for the blue field of the flag. Fill the uncovered section with blueberries, piling them high.
- Pipe the whipped cream cheese frosting in horizontal rows between the strawberries to create the white stripes. Use a shell border pattern or pipe straight lines, as desired.
- Arrange more strawberry quarters on top of the first layer of strawberries to give the cake a full, abundant look. Aim to pile the berries as high as the whipped frosting stripes.
- Refrigerate until the frosting is firm, about 30 minutes.Keep cake refrigerated until ready to serve. Let stand at room temperature 15 minutes before serving for best cake texture.
