Homemade Crescent Rolls are so much better than canned! Perfect for breakfast, brunch, or any meal. Freezer-friendly and overnight options make this recipe a keeper.

Who doesn’t love delicious, buttery crescent rolls? They range from flaky and crusty to soft and pillowy. These homemade crescent rolls fall into the latter category, with soft texture, rich buttery flavor, and a kiss of sweetness. This is my favorite recipe for crescent rolls – and I’ve tried many! The yeasty flavor really comes through. And the addition of honey in the dough is a simple touch of genius. It gives the rolls a honey-butter note – without being overpowering. They’re not complicated to make, and as long as you follow a few simple steps, they turn out perfectly every time.

Why Make Homemade Crescent Rolls?
Sure, you could buy a tube of canned refrigerated crescent rolls. But homemade crescent rolls are a thousand times better. Read the label on the can and you’ll find some strange ingredients, including palm oil (and NO butter). For all the compliments and wows at the Sunday dinner table, buttery scratch-made crescent rolls win every time. They’re made with staple pantry and refrigerated ingredients. And if it’s convenience you’re looking for, there are plenty of make-ahead options.

Make the Crescent Roll Dough
Mix together 1 1/2 cups of flour, 2 packages instant or active dry yeast, and a little fine grain salt in the bowl of an electric mixer. If you don’t have an electric mixer – no worries. These rolls can be made without a stand mixer. Whisk the mixture together and set aside temporarily.

Combine butter, milk, and honey in a small saucepan and heat on low while stirring until melted. Let the mixture cool down to 115°F to 120°F.

Pour the liquid mixture into the dry ingredients in the mixing bowl. Mix together with your mixer’s paddle attachment, or with a big wooden spoon by hand, until the ingredients are well incorporated. Make sure to scrape down the bowl. Especially the bottom, to make sure there are no pockets of flour hiding there.

The dough is enriched with egg yolks. This gives the dough a golden hue and promotes browning. Add the egg yolks to the bowl. And mix well to combine.
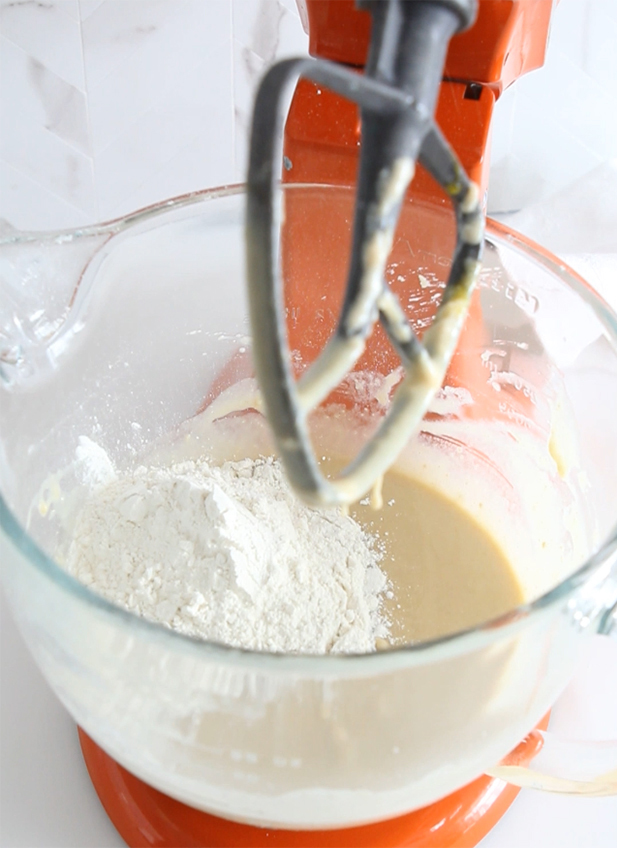
Add Additional Flour
Critical point: Add in just enough additional flour to the batter to form a soft dough, about 1 cup to start. The dough should be sticky. Too much flour will make the baked rolls firm and not fluffy – as they bake they are likely to unfurl. Like most yeast dough recipes, this one has a flour range: 3 3/4 to 4 1/4 cups. You may not use all of the flour.
Knead the Crescent Roll Dough
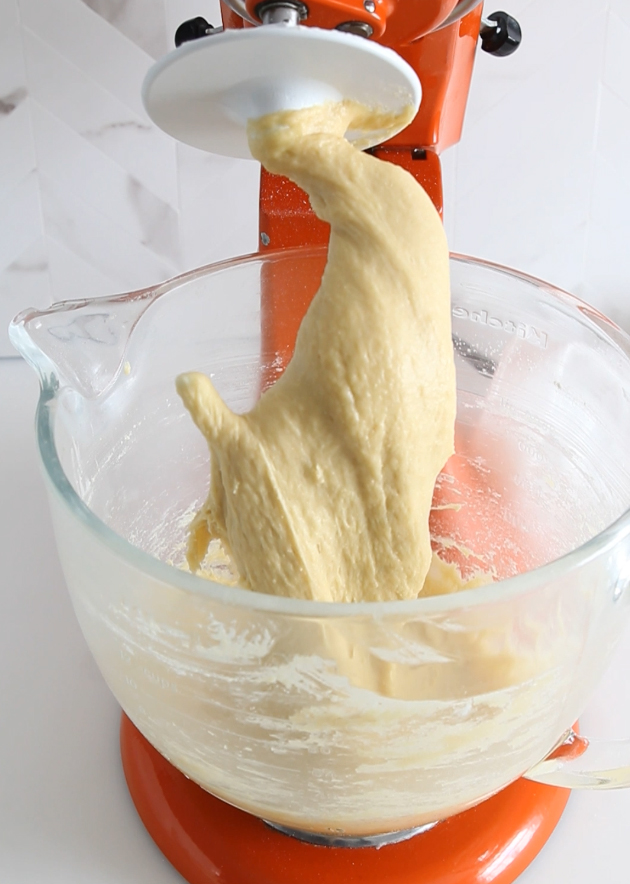
Switch from the paddle attachment to the dough hook. (Or turn dough out onto a lightly floured surface to knead by hand.) Turn the mixer on low and knead for 6-8 minutes. The dough should be slightly lax and a little sticky. While mixing it should clean the sides of the bowl but not the bottom of the bowl. If dough sticks to the upper sides of the bowl while mixing, add just a little more flour and mix again. When you raise the dough hook from the bowl, the dough should be soft and slightly sticky. It should drape from the hook. And it should slowly, and partially ease itself back into the bowl. Transfer the dough to a greased bowl and turn over once. Then, cover with plastic wrap and let rise in a warm place until doubled. About 45 minutes.
Overnight Option
After the dough has risen, punch it down. Then cover it with plastic wrap and refrigerate the dough overnight. The next morning, turn the chilled dough out onto a lightly floured surface and shape as directed.

Shaping the Crescent Rolls
Of course, if you’re looking to enjoy these rolls right away, you can immediately shape the dough after punching it down – here’s how.
Cut the dough in two pieces. Working with one piece at a time, roll a half out to a 12-inch circle. Cut the dough into 12 wedges.
If you prefer, you can make slightly smaller rolls by cutting the dough into 16 triangles instead of 12. (I prefer the larger rolls.)

Roll the triangles up from the large end, tucking the point underneath the roll.
Freezer-Friendly Option
Immediately after shaping, freeze the rolls on parchment-lined baking sheets until firm. Transfer to a freezer bag or other freezer container. Return to the freezer and store for up to 4 weeks. To bake, allow them to rise, increasing the rise time to 2 1/2 to 3 hours and bake as directed.

If you’re not freezing the rolls, place them on parchment-lined baking sheets, cover, and let rise until doubled and puffy. About 45 minutes. Bake at 375°F for 9-11 minutes, or until the rolls are puffy, golden brown, and fragrant.
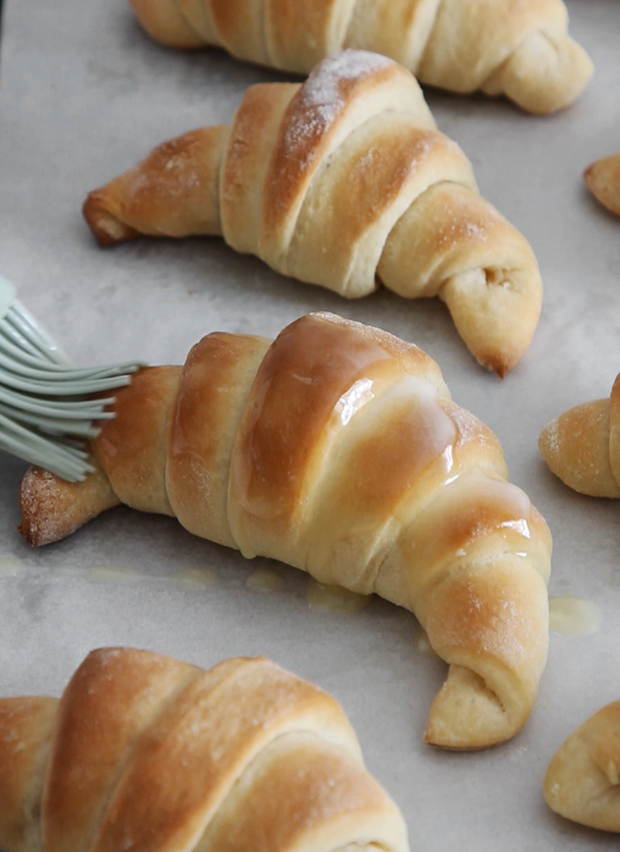
Brush the Rolls with Butter while Hot
Yum, I could eat this picture! While the crescent rolls are piping hot on the baking sheet, brush each with a little melted butter. Or a lot of melted butter -ha!

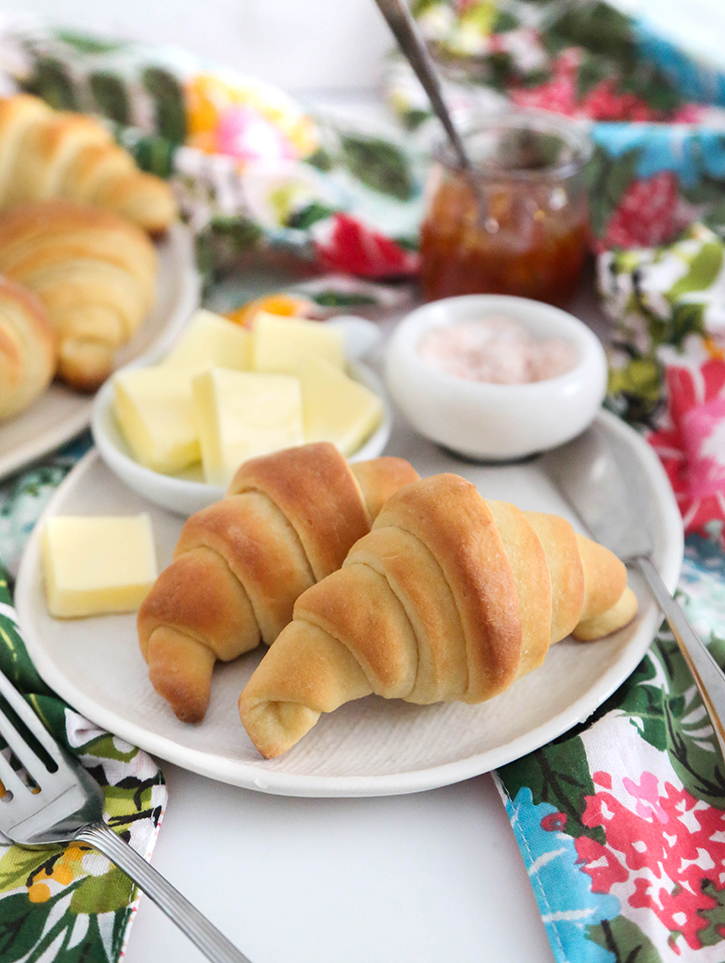
The end result? Gorgeous, puffy, buttery, yeasty, homemade crescent rolls. Pile them up on a platter and serve them for any meal. They’re excellent in the morning, split and stuffed with butter and jam. Fill them with chicken salad for lunch, or have them with a garden salad.
However, I think they are best with a savory dinner. And they’d be so good with the Easter ham or Thanksgiving turkey. My husband eats them for dessert, warmed up in the oven, then stuffed with butter and drizzled with honey.
After testing and re-testing, and eating my weight in these buttery delights, I couldn’t wait to share my holy grail recipe with you. Some crescent roll recipes have flaky crusts, bordering on croissant territory. Don’t expect that from these. These are pure dinner roll heaven. Soft and pillowy, and cottony on the inside. There are many ways to enjoy these, as I’ve mentioned. But there’s nothing like the simple joy of unfurling a hot crescent roll straight from the oven and eating it as-is.
You can follow along the making of these rolls with my video tutorial below.
Related recipe: Perfect Buttermilk Dinner Rolls

Homemade Crescent Rolls
Equipment
- large baking sheets (2)
- parchment paper
- sharp chef’s knife or pizza cutter
- Pastry brush
Ingredients
- 3 3/4 to 4 cups all-purpose flour plus more for rolling dough
- 4 1/2 teaspoons instant yeast or two 1/4 oz. packages active dry yeast
- 1 teaspoon fine grain salt
- 1 cup whole milk
- 1/2 cup unsalted butter
- 1/4 cup wildflower honey or other local honey
- 3 egg yolks from large eggs room temp.
- 1/2 cup melted butter salted or unsalted
Instructions
- In the bowl of stand mixer fitted with the paddle attachment, or in a large mixing bowl, combine 1 1/2 cups of the flour, the yeast, and the salt. Whisk to combine.
- In a small saucepan, add the milk, butter, and honey. Cook while stirring over low heat until melted. Cook to 115 °F-120 °F. If the mixture exceeds this temperature, let it cool to 115 °F-120 °F.
- Add the milk mixture to the dry ingredients, and stir together on medium-low speed with the paddle attachment (or stir together with a wooden spoon by hand) about 2 minutes. Scrape down the sides and bottom of the bowl and mix again briefly.
- Add the egg yolks and mix on medium speed to combine, another 2 minutes.
- Critical point: Stir in just enough of the remaining flour to form a soft dough. Begin with one cup, and add more as needed (about 1/4 cup at a time) while stirring on low speed to form a consistent, sticky, soft dough.
- Switch from the paddle attachment to the dough hook (Or turn the dough out onto a lightly floured surface and knead by hand). Knead for 6-8 minutes on medium-low speed. The dough should clean the sides of the bowl while mixing. It’s totally fine if the dough sticks in the bottom of the bowl a little. If the dough sticks to the top sides of the bowl, gently tap in a little extra flour 1 tablespoon at a time, until it cleans the top sides of the bowl. Remember: aim for soft and slightly sticky dough. When the dough hook is lifted from the bowl, it should drape from the hook. As it hangs there, the dough should partially relax back into the bowl.
- Spritz a large bowl with cooking spray, or butter the bowl. Place the dough into the bowl and turn over once to coat; cover with plastic wrap and let rise in a warm place for 45 minutes, or until doubled.
- Punch down the risen dough. Turn it out onto a lightly floured surface. Divide the dough into two pieces.
- Roll each portion to a 12-inch circle. Cut each circle into 12 wedges. (Cut the circle crosswise in the center to create 4 pieces; then cut each quarter into 3 triangles to make 12 wedges).
- Lightly brush each triangle with melted butter; save leftover melted butter. Roll up the triangles from the wide ends. Tuck the points underneath the rolls and gently curve the ends to form crescent shapes.
- Place the rolls 2 inches apart on the baking sheets. Cover and let rise until puffy and nearly doubled, 30-45 minutes.
- Preheat the oven to 375°F. Line two large baking sheets with parchment paper.
- Bake for 9-12 minutes, or until the rolls are golden brown and fragrant. Remove from the oven and immediately brush with the reserved melted butter. Serve warm.
- Store rolls in an airtight container or zip top bag. Reheat rolls on parchment-lined baking sheets in a preheated 350°F oven for 6-8 minutes.
- See recipe notes for overnight refrigerator method, and for freezing instructions.

Has anyone tried to make this recipe gluten free? And what gluten free flour combination did you use? Thanks.