This Meringue Christmas Tree Cake is a showstopping edible centerpiece made of white cake layers, raspberry filling, and Swiss meringue buttercream. It’s covered in dragee-studded meringue cookies to make your holiday sparkle!

For many, the joy of Christmas has much to do with the preparations – as much as the day itself! I am one of those people. I find decking the halls, planning the feast, and certainly baking all the things to be ritualistic. And there’s comfort in revisiting traditions. One of those traditions is creating an edible centerpiece for the Christmas table. This Meringue Christmas Tree Cake is this year’s creation. It’s a tall patisserie-inspired cone-shaped tree decked out in sparkling meringues. Despite its towering appearance, it’s not awfully hard to make!
The inspiration for this cake comes from this Baked Alaska Tree recipe from Martha Stewart. I’ve had it pinned for a very long time. To me, it looks so chic and sophisticated – yet simple. After reading the recipe and realizing they used a manila folder (!) to create the shape, I wondered if the same technique could be used with large poster board, and something much less meltable. Like cake! The answer – yes. Read on for the pictorial to show you how!


White Cake Layers
This meringue Christmas tree cake begins with white cake layers. Specifically, my favorite white cake recipe. I’m sure this will be no surprise to regular readers. I use this cake recipe all the time when I want a beautifully pale interior that is moist and flavorful. You’ll need four 6″ cake layers. I used these pans to bake the batter.

Level and Torte the Cakes
Use a serrated knife or wire cake leveler to even the tops. Then torte (cut horizontally) each cake into two approximate 1″ layers.

Concentric Circles
Further trim 3 sets of the cake layers using pastry rings and cookie cutters to create concentric circles. If you don’t have pastry rings, you can make yourself circle templates and cut them from card stock. Leave one set of cake layers as-is, in 6-inch rounds. Cut another set of cake layers into 5″ rounds. The next set is cut into 4″ rounds, and the last set is cut into 3″ rounds. Save the cake scraps! They’ll come into play later in this recipe.

At the end of all that trimming, you’ll have graduated layers to work with. Now, if you wanted to skip the paper cone-making, you could. Just fill, stack, and frost this cake upright – layered just as you see it here. And use Swiss meringue buttercream to spackle the gaps and create an organic tree shape. But before you decide, read more to see how I created the patisserie-inspired cone shape.
The Tree Top.
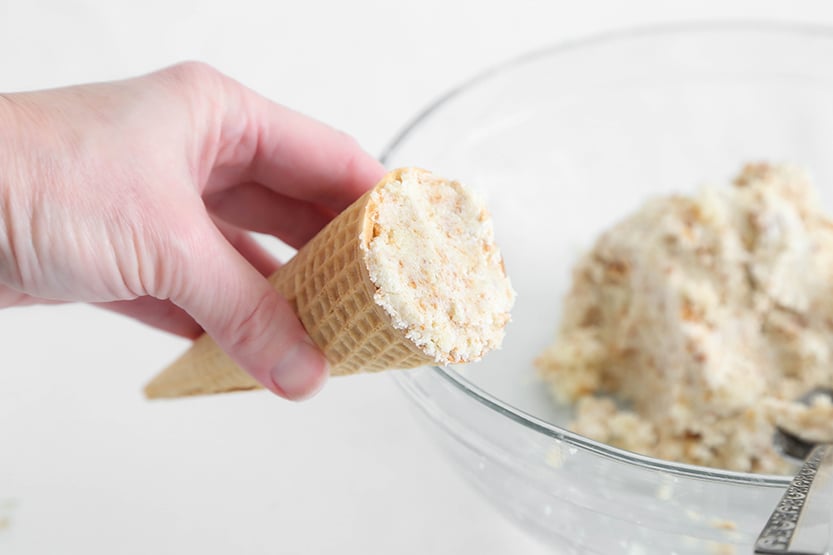
Remember those cake scraps? Discard the crusty bits and crumble the soft cake scraps in a bowl. Add a little vanilla Swiss meringue buttercream and mix together. This ‘cake pop’ mix is packed into a sugar cone and helps to form a perfect (and sturdy!) tree tip. Refrigerate the cone, and save the extra cake pop mix, because you’ll use that later as well.
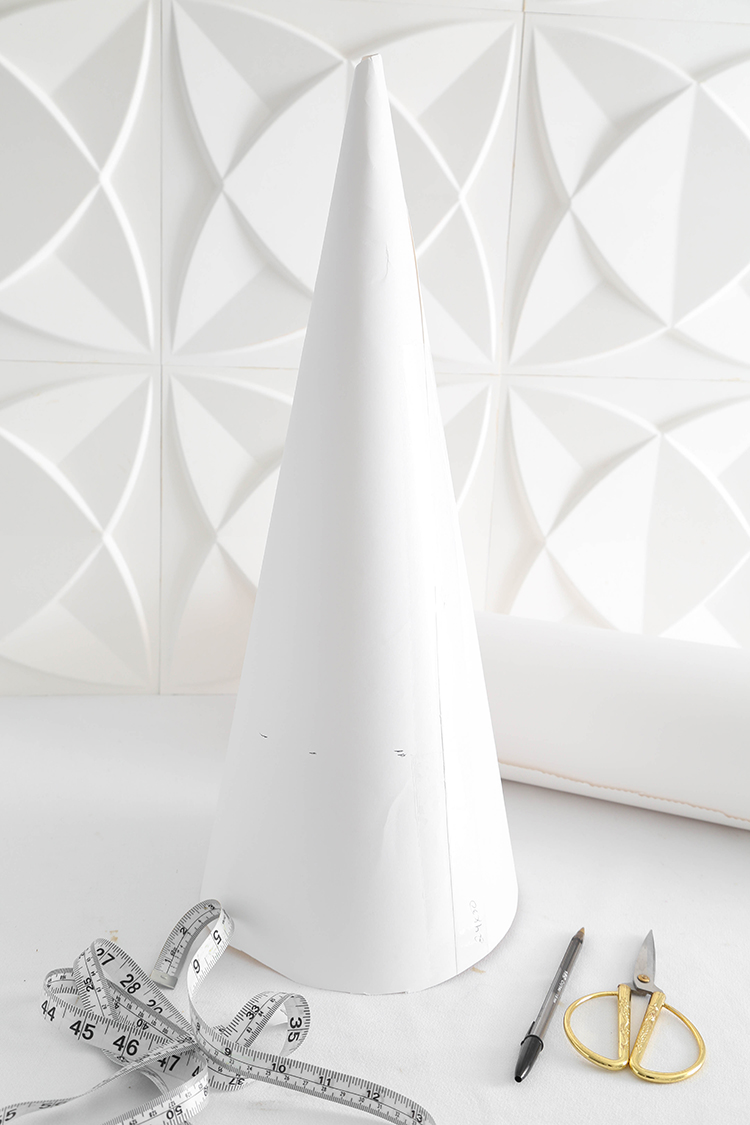
Make the paper cone mold.
How many times have I purchased expensive molds for desserts? Too many! It can get quite costly. I suppose that was one of the reasons that Martha’s manila folder technique appealed to me so much. I was also inspired by Laduree’s macaron and truffle towers. They are so beautiful, and so quintessentially ‘patisserie’. Even if I’d wanted to buy a 16″ tall mold for this meringue Christmas tree cake, I couldn’t. They are simply not available.
To make the cone, purchase a new (unused) standard size (22×28 or 24×30 inch) piece of poster board. Roll it into a cone shape and secure with clear packing tape. Tape any parts of the spiraled edge inside of the cone down with more packing tape. Measure the cone from the tip down to 16″ and trim the bottom. The opening should be around 6.5 to 7″ in diameter.

Assembly.
To fill the cone, get a tall stock pot and fill it with soft tea towels – or even crumpled aluminum foil. Turn the paper cone upside down and put it inside the stock pot. Arrange the towels or aluminum foil on either side of the cone, so that it stands firmly upright.
Begin the assembly by piping about 4 inches of Swiss meringue buttercream into the tip of the cone (this recipe make a large batch of buttercream – you’ll need it!). Then, insert the filled sugar cone into the tip, squeezing some of the frosting around it as you push it in. Next you’ll pipe a ring of buttercream around the edge of the ice cream cone, and pack some of the reserved cake pop mixture on top. You’ll use just enough of the cake pop mixture to create a layer with a top surface area of about 3″. Which is the size of the smallest cake layer. Next, you’ll add a 3″ cake layer, pipe a ring of buttercream around the edge, and fill it with raspberry jam. Repeat the process using the other cake layers, piping and filling and stacking until all of the layers are used.

Refrigerate!
Swiss meringue buttercream stiffens significantly in the refrigerator, and we’ll use this to our advantage! Transfer the filled cone (still upside-down) in the pot to the refrigerator. Let it chill for 2 hours minimum. When it comes time to unmold, turn it upright onto a plate and use sharp scissors or an x-acto knife to cut the packing tape at the seams. Gently unfurl the paper, splitting the packing tape on the inside seams as you go. Store the cake in the refrigerator until you are ready to frost and decorate it.

Make the Meringue Cookies
The meringue cookie recipe is so simple and classic. I’d call it definitive – so much that I put it in my first cookbook. Whip up a big batch and pipe it on a large parchment-lined baking sheet (or two) in large and small star shapes. I also piped a few large and small kiss shapes, but I think the stars are my favorite. The large and small sizes will help you effectively fill almost every space on the cone. After you pipe the cookies, sprinkle on silver dragees for maximum sparkle.
Although these cookies are quick to whip up, they require a low and slow bake time. So you may want to plan ahead for your oven to be occupied for 1.5 hours.

Frost and decorate.
As I mentioned earlier, the Swiss meringue buttercream recipe provided makes a large batch, and you’ll need every bit of it! You should have plenty enough leftover from assembling the cake to frost it, and to affix all of the meringues to the outside.
I will include a short video here of the Swiss meringue buttercream-making process. It’s an old video, but many still find it helpful. (You’ll notice that Biscuit pug is a young pup in the video!)

Here’s the finished cake! I tried all kinds of toppers for this cake – a gum paste star, some fringed Mylar cupcake picks, a Dresden crown. It wasn’t until the table was set, that prompted a simple but luxurious velvet blue bow topper with flowing ribbons down each side of the cake. Speaking of this table setting…

DIY Block Printed Table Linens.
Recently, my MIL gave me custodianship of her beloved Royal Sapphire dishes. I wanted to use them in a Christmas tablescape, but with less conventional holiday colors. I found a brilliant fuchsia tablecloth with pomegranate motif that would be eye-popping with the blue dishes. But it was a little too expensive and the pattern was a tad busy.
I was talking about this to Rachel Ann, who is pretty much resident crafter for our craft blog Confetti Fix. Her college studies were focused on art and specifically print making. She offered to create some custom block printed linens in the same color, and with a pomegranate motif! I just adore how they turned out. And what’s better? She’s created an entire DIY of the process on Confetti Fix. It’s like a block printing 101 class for beginners. So if you’re interested in learning about this ancient and unique art form, then hop on over to read her post!

The Little Things
The entire table came together with some of the most brilliant fuchsia grocery store roses I’ve ever seen! They perfectly matched the table linen color. And these little Godinger place card holders deserve a mention, too. I’ve used and reused them many times now. Little things like this feel special, and make a big impact.


For the record, and contrary to what this image shows, cutting this cake should start at the top. Slice the top off crossways where the cake pop portion ends. Then, the remaining layer cake can be cut into pieces.

This cake is such a delight to eat! The two meringue elements of Swiss meringue buttercream and crunchy meringue cookies keeps this confection light. The cake is moist with a sour cream tang, and tart raspberry jam is a sharp foil for so many creamy elements. I couldn’t resist adding pomegranate arils as garnish, and to match the pomegranate table linens.
I’ve really enjoyed continuing this edible centerpiece tradition. If you’d like to see others, here’s my White Birch Yule Log Cake, Ruby Chocolate Truffle Tower, Gingerbread Star Cookie Tree and Black Forest Buche de Noel. Happy Christmas!

Meringue Christmas Tree Cake
Equipment
- 6×2-inch round cake pans (4)
- Kitchen-dedicated shears or scissors
- 22×28 or larger poster board
- Clear packing tape
- parchment paper
Ingredients
White almond sour cream cake layers
- 1 box white cake mix 15.25 oz.
- 1 cup all-purpose flour
- 1 cup granulated sugar
- Pinch of salt
- 1 cup sour cream
- 1 cup cold water
- 3 large eggs
- 1 teaspoon vanilla extract
- 1 teaspoon almond extract
Filling
- 2 cups raspberry jam
Swiss meringue buttercream
- 8 large egg whites about 1 cup or 8 oz.
- 2 cups granulated sugar
- 3 cups unsalted butter at room temperature
- 1 tablespoon almond extract
- 1/4 teaspoon fine grain salt
- Small dab royal purple soft gel food color optional
Assembly
- Reserved cake scraps
- Sugar cone
Meringue cookies
- 6 egg whites
- 1/8 teaspoon cream of tartar
- 1 ½ cups fine grain granulated sugar or caster sugar
- Small silver dragees
- 1/3 cup pomegranate arils for garnish optional
Instructions
Cake layers
- Preheat oven to 350°F. Grease and flour four 6×2-inch round cake pans.
- Whisk together the first 4 ingredients in a large mixing bowl. In a four-cup measure, stir together the sour cream, water, eggs and extracts. With a hand mixer running on low speed, gradually pour the liquid ingredients into the dry ingredients. Scrape the bowl down and mix again.
- Divide the cake evenly between the pans. Bake for 25- 35 minutes, or until the cake springs back in the center when pressed.
- Turn out the cakes on a wire rack to cool completely.
- Using a serrated knife or leveler, torte each cake horizontally so that you have eight 6-inch cake layers.
- Next, trim two of the layers to 5-inches, another two to four inches, and another two to 3-inches. Leave one set of 6-inch cake layers as-is (untrimmed). Save all the cake scraps in a bowl and cover with plastic wrap; reserve for later use.
- Chill the cake layers in the refrigerator to firm them, about 30 minutes. Meanwhile, make the Swiss meringue buttercream.
Swiss meringue buttercream
- Place a saucepan filled 1/3 full of water over medium heat. Bring to a simmer.
- In a large stainless-steel bowl, combine the egg whites and sugar. Set the bowl over the simmering water and cook while whisking intermittently. Cook until the mixture is hot (110°F) and you can no longer feel sugar granules when the mixture is rubbed between your finger and thumb. Transfer the hot mixture to the bowl of a stand mixer fitted with the whisk attachment. Beat on high speed for 10 minutes or until a thick, shiny meringue forms that holds stiff peaks. The bowl should feel cool to the touch. If it doesn’t, refrigerate the meringue in the bowl for 10 minutes. Return the bowl to the mixer and swap the whisk attachment for the paddle attachment.
- Beat the room temperature butter into the meringue one cube at a time on medium-low speed, waiting to add the next cube when the previous cube disappears. The batter will deflate with the butter addition, and may even look curdled (if the butter was the slightest bit cold this happens), but this is normal. When all of the butter is added, beat the mixture on high speed until light in color and fluffy, about 5 minutes. Beat in the almond extract and salt. To whiten the frosting, add just a tiny dab of royal purple gel food color to the buttercream and mix to combine. This will color correct some of the natural butter yellow tinge of the finished buttercream.
- Transfer the buttercream to two large disposable piping bags with a 1” hole snipped in the tips.
Assemble the cake
- Crumble the reserved cake scraps in the bowl and remove any hard or crust bits. Add Swiss meringue buttercream 1 tablespoon at time, mixing well to form a cake pop mixture that holds together and packs well. Completely fill the sugar cone with the cake pop mixture, and cover the remaining mixture for later use.
- Make a tall cone shape using the poster board and secure the outside seams with packing tape. Trim it to 16” tall. The bottom opening should be about 6.5 inches in diameter. If your opening is larger or smaller, remove the tape and twist the cone so the bottom opening is 6.5-7 inches in diameter. Close all seams on the outside of the cone with packing tape, and do the same on the inside. The interior also needs to be perfectly smooth for a flawless cone shape
- Make room in your refrigerator for a 16” tall cake.
- Use a tall stock pot in which to place the cone upside-down, and pad the bottom of sides of the pot with tea towels or crumpled aluminum foil. The cone should be firmly standing upright with the open end toward the sky.
- Pipe about 4” of buttercream into the tip of the cone. Press the filled sugar cone into the buttercream until the frosting squeezes around the sugar cone. Pipe in a little more buttercream to cover the sugar cone. Pack the remaining cake pop mixture into the cone firmly. Pipe in a thin layer of buttercream to cover it. Place a 3” cake layer on top of the piped frosting. Pipe a ring of buttercream around the edge of the cake layer and fill with a thin layer of raspberry jam. Top with a second 3”inch cake layer pipe another ring of buttercream around that cake layer and fill with raspberry jam as before.
- Continue this process with the 4” cakes, 5” cakes, and 6” cakes. The cake layers should come to the top of the open end of the cone, or within 1-2” of the opening (it doesn’t need to be exactly 16” tall). If the cake has to travel, dowel the cake ¾ of the way through the center of the cake to secure all the layers together.
- Transfer the upside-down cone in the pot to the refrigerator and chill for 1 hour. Remove the cone from the pot and turn upright onto a serving plate. Refrigerate the unmolded, upright cake for another hour.
- Carefully unmold the cake by cutting the tape seams on the outside with an x-acto knife or sharp scissors. As you unfurl the poster board cone, snip the inside tape seams as the appear. Gently remove the unfurled poster board from the cake. Transfer the cake to the refrigerator while you make the meringues.
Meringue cookies
- Preheat the oven to 170°F. Line two or more large cookie sheets with parchment paper. Fit two or more large pastry bags with a large closed star decorator piping tip.
- Place the egg whites in a spotlessly clean bowl and whip them with an electric mixer on medium speed until frothy. Add the cream of tartar. Start the mixer again and continue to beat the egg whites.
- Once the egg whites form soft peaks increase the speed to high and gradually add the sugar, a little at a time. Beat the egg whites until they are very shiny and hold stiff peaks but are not dry or crumbly, about 6 minutes. To make sure the sugar has completely dissolved, rub a bit of the meringue between two fingers to see if any granules of sugar remain. If grains are present, continue to beat the meringue until the sugar has fully dissolved.
- Spoon the meringue into the prepared piping bags. Pipe meringues of large and small sizes onto the lined cookie sheets. Sprinkle meringues with the silver dragees before baking.
- Bake for 90 minutes, turning them halfway through the cooking time to ensure even cooking. When the meringues are done, they should be dry to the touch. You can remove them from the oven, or if time permits, turn off the oven and let them stand inside the oven until the oven cools completely. When cool, you should be able to lift the cookies easily from the parchment sheet.
Decorate the cake
- Apply a thin coat of the leftover Swiss meringue buttercream all over the chilled cake. Starting at the bottom of the cone, apply the meringue cookies, using the larger ones first, around the circumference of the cone.
- Work your way up, using buttercream as needed as adhesive to the backs of the meringues, and fill in gaps using smaller meringues. It’s okay if not every space is filled, and you can still see some of the smooth white buttercream between the meringues.
- Store the decorated cake in the refrigerator until ready to serve.
- To serve the cake, cut the top 1/3 of the cake away, just below the cake pop layer, and place it on a plate to the side (you may ask guests if anyone wants the sugar cone tip!). Slice the remaining layer cake into thin, tall pieces. You may divide one tall piece into two at a buttercream layer.
- Garnish cake slices with pomegranate arils, if desired.
Notes
- Winter is the perfect time to make meringue cookie because of the dry atmosphere. Avoid making meringues in humid weather.
- I used a tiny drop of royal purple gel food color to cancel the slight yellow tinge in the buttercream. If you do this, only use a tiny drop, and remember that food color intensifies over time. If used correctly, the addition of purple makes a wintry (or wedding) white buttercream that matches the meringue cookies.

This is gorgeous! Those meringues are stunningly white, and are also one of my all-time favourite treats to have at any time of the year ? They also make this cake look just like my tree since it’s white, too! Just love, love, love this creation.
Thank you so much! Happy holidays!