Make these cute Lucky Peppermint Pig Cookies for good luck in the New Year! Based on a Victorian holiday hard candy tradition, but in cookie form.

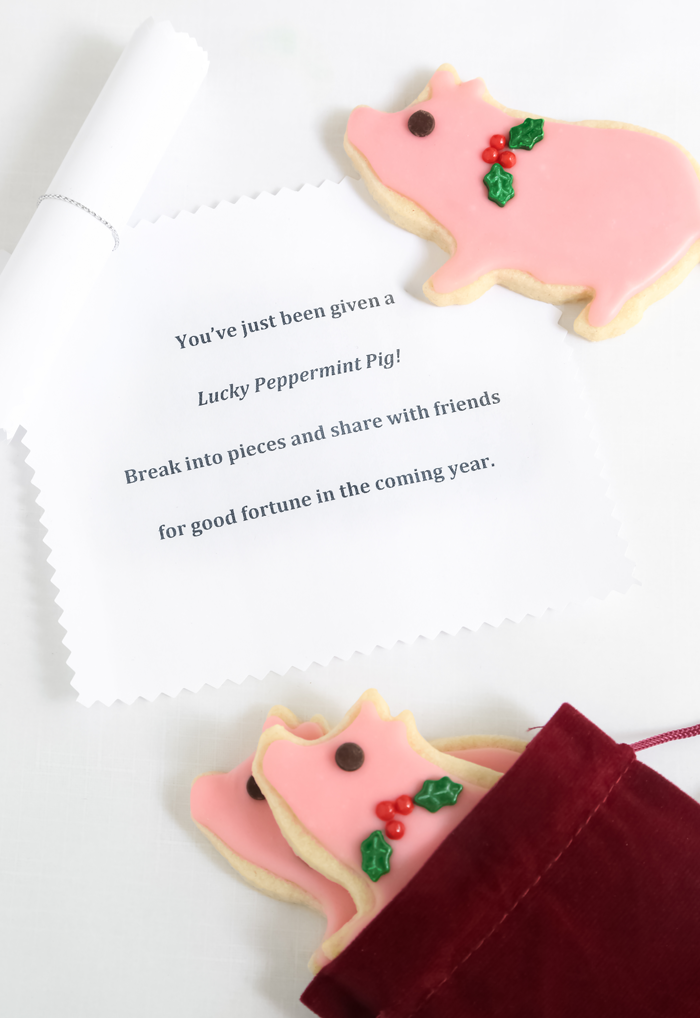
Have you ever heard of The Famous Peppermint Pig? It’s a Victorian holiday tradition in the form of hard candy molded to look like a pig. The candy is accompanied by a little pouch and hammer so it can be broken it into pieces. And then shared with friends and family. This tradition has come to symbolize good health, happiness and prosperity. Even though the hard candy pigs are still in production today, I thought a cookie version would be cute, too!

I purchased the cookie cutter here. If you don’t want to buy a cookie cutter, just print any FREE online piggy silhouette, (search ‘free pig silhouette’ with image size about 3 inches) cut out the shape and trace it onto heavy card stock (like scrap-booking paper). Then cut the pig shape out of the card stock. Lay the paper piggy onto your chilled, rolled cookie dough and use a small paring knife to cut around the shape. It’s a little more work, but easy enough!

An Easy Icing Recipe
The icing recipe for this cookie is so easy to make. And the decorating is hardly any work at all. The piggy’s eye is a mini chocolate chip (point-side-down) and I used these holiday sprinkles to add holly berry motif at the collar.


I decided to stick with the tradition of gifting the pigs in a little velvet pouches (I found a 10-pack here). You can fit about three cookies in the small 6-inch pouches, or you can buy larger pouches to fit more cookies.
Even though these pigs aren’t the hard candy version, you can still share them with the people you love for good luck in the coming year!
Want more giftable goodies?
Last year’s fifth day advent recipe was
Marbled Peppermint Sugar Cookies!


Lucky Peppermint Pig Cookies
Equipment
- pig cookie cutter
Ingredients
Cookies
- 1/2 lb. unsalted butter
- 1 cup granulated sugar
- 1 egg
- 1 tsp. vanilla extract
- 3 cups all-purpose flour
- Pinch of salt
Glaze
- 2 1/4 cups confectioners' sugar, sifted
- 2 tablespoons light corn syrup
- 2 drops red food color
- 1/2 teaspoon peppermint extract
- 1 to 2 tablespoons milk
Decors
- 1/2 cup mini chocolate chips
- Holly berry and holly leaf sprinkles
Instructions
- Make the cookies: In an electric mixer fitted with the paddle attachment, mix the butter and sugar together until just incorporated. Do not over-mix at this stage, or the cookies may spread while baking.
- Add the egg and vanilla extract. Mix again on low speed, stopping to scrape down the sides of the bowl intermittently as needed.
- In a medium bowl, whisk together the flour and salt. Add to the butter and egg mixture. Mix on low speed until a dough is formed and there are no longer any streaks of butter in the mixing bowl. The dough will often clump around the paddle attachment while being mixed. This is normal and a good sign that your dough is the right consistency. If your mixture does not come together and is crumbly, add ice cold water 1 tbsp. at a time until the dough clumps. Roll the dough flat between sheets of parchment paper and chill until ready for use, at least 30 minutes.
- Preheat the oven to 350°F. Line two baking sheets with parchment paper.
- Use a 3.75-inch pig cookie cutter to stamp shapes from the dough, or use the printable PDF as a template (see blog post). Transfer the shapes to the prepared pans and bake for 10 to 12 minutes, or until the cookies are golden brown around the edges. Re-roll dough scraps and repeat process. Transfer cookies to a wire rack to cool completely after baking.
- Make the glaze: Whisk the first four ingredients together and 1 tablespoon milk until smooth. The glaze should be very thick but soft enough to settle into a perfectly smooth surface on the cookie. If the glaze is too thick, add additional milk drops at a time until it becomes the correct consistency. Transfer the glaze to a piping bag and pipe it on the cookies, or gently spoon the glaze neatly onto the cookies.
- Decorate! While the glaze is still wet, place a mini chocolate chip flat-side-up onto a pig face for the eye. Add holly berries and leaf sprinkles at the neck. Repeat with remaining cookies. Let stand until dry, about 2 hours. Gift peppermint pigs in velvet pouches.
Notes

Aah these are so cute!! The perfect Christmas gift 🙂
Rachael xx.
http://theteacozykitchen.blogspot.co.uk/
How adorable and yummy….love the pink color..I love the peppermint marble cookies too…I will be making these for sure.
Those are just too cute!
Kari
http://sweetteasweetie.com/10-minute-pretzel-chocolate-chip-cookies/
Nice, Looking so cute.
For Gifts
http://www.mysoregiftsflowers.com/
These are so adorable!
Happy Holidays, Yolonda
http://www.stylefragment.com/home/2016/12/6/gift-guide-for-the-bauble-babe
These are adorable!
Happy Holidays, Yolonda
http://www.stylefragment.com/home/2016/12/6/gift-guide-for-the-bauble-babe
These are TOO CUTE! I love the chocolate chip eyes 🙂
I was about to making this when I noticed there is no leavening. Is this correct?
Yes, that is correct. There is no chemical leaven so the cookie surface is smooth and flat for decorating. Thanks for asking!
So much cuter than the hard candy version, nicer to eat … and none of the crazy smashing!
Heather can these be frozen with the icing on? Thanks!
I have never frozen these, but the icing dries hard like royal icing. I think you could without issue.