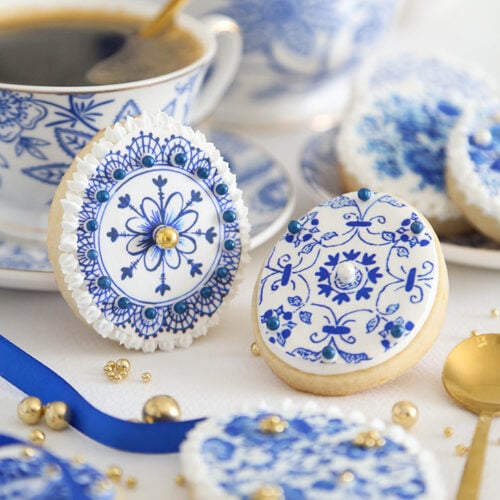
Delft Blue Sugar Cookies

These Delft Blue Sugar Cookies are as pretty as they are delicious! With a buttery sugar cookie base and a smooth layer of royal icing, they get their elegant look from printed icing sheets featuring classic blue and white designs. Embellish with gold dragees and a ruffle border for a gorgeous finish. They’re perfect for Easter, weddings, or whenever you want a little extra sparkle.The icing sheet I've linked in the recipe and blog post has 12 printed Delft images. You will only need 1/2 of the sugar cookie recipe to make the 1 dozen cookies.
Equipment
- 2.5-inch egg cookie cutter
- small round decorator piping tip, #1 or #2
- small closed star decorator piping tip
- kitchen dedicated tweezers
- kitchen dedicated art brush with soft bristles
Ingredients
Sugar cookie dough
- 1/2 lb. unsalted butter
- 1 cup granulated sugar
- Zest of 1 lemon
- 1 large egg
- 1 tsp. vanilla extract
- 3 cups all-purpose flour
- pinch of salt
Royal Icing and décors
- 4 cups confectioners’ sugar sifted
- 3 tablespoons meringue powder
- 1/2 cup warm water plus additional for thinning
- 1 teaspoon lemon extract
- Piping gel or corn syrup
- 1 Delft blue icing sheet with 12 images
- Food color marker
- Gold dragees
- Sugar pearls white and blue
- Gold luster dust I used pharaoh’s gold
- Vodka or clear extract
Instructions
Sugar cookies
- In an electric mixer fitted with the paddle attachment, mix the butter and sugar together until just incorporated. Add the lemon zest. Mix again. Do not over-mix at this stage, or the cookies may spread while baking.
- Add the egg and vanilla extract. Mix again on low speed, stopping to scrape down the sides of the bowl intermittently as needed.
- In a medium bowl, whisk together the flour and salt. Add to the butter and egg mixture. Mix on low speed until a dough is formed and there are no longer any streaks of butter in the mixing bowl. The dough will often clump around the paddle attachment while being mixed. This is normal and a good sign that your dough is the right consistency. If your mixture does not come together and is crumbly, add ice cold water 1 tbsp. at a time until the dough clumps. Roll the dough flat between sheets of parchment paper and chill until ready for use, at least 30 minutes.
- Preheat the oven to 350°F. Line two baking sheets with parchment paper.
- Use a 2.5 -inch egg cutter to stamp shapes from the dough and transfer them to the prepared pans. Chill the shapes in the refrigerator for 15 minutes. Bake cookies for 12 minutes, or until the cookies are lightly brown on the edges. Transfer the cookies to a wire rack to cool completely.
Royal icing and decors
- In the bowl of an electric mixer fitted with the whisk attachment, stir the confectioners’ sugar and meringue powder on low speed until combined.
- Add the water and beat on medium-high speed until thickened to stiff peaks. Mix in the flavoring. Beat again until combined and fluffy. Transfer half of the stiff peak icing to a piping bag fitted with a small closed star decorator tip. Cover the tip with a damp paper towel and set aside. To the bowl of remaining icing, mix in drops of water until the icing thins to flood consistency (It should be thick and pourable like a milkshake. Run a spatula through the icing to check; the indention should disappear close to the count of 10.) Use the icing immediately or drape a damp tea towel over the mixing bowl or bowls to prevent the icing from drying out.
- Transfer the icing to a disposable piping bag fitted with a small plain round tip, such as #1 or #2. Pipe a line of frosting around the outer edge of the cookies. Let stand for 1 minute. Flood the inside of the shape with more icing until completely covered and smooth. Let stand until dry, about 4 hours or overnight.
- Use the same egg cookie cutter used for the dough as a template to cut out icing sheet images. Center the cutter on an image, and using a food color pen, trace around the egg with a food color marker and cut it out. I cut the shapes out with kitchen-dedicated scissors, or you can use an X-acto knife. Store the cut-outs in a zip-top bag so they don’t dry out.
- After the royal icing has completely dried on the cookies, brush each with a light layer of piping gel, and then place the icing sheet cut-out on top. Turn the cookies upside down to dry completely, so the wafer paper lies perfectly flat. This will take a couple of hours to dry completely.
- When cookies are dry, flip them upright. For a frilled decorative edges, use the reserved piping bag with the star tip to pipe a stiff peak royal icing ruffle around the edges of some of the cookies.
- To decorate plain edges, mix gold luster dust with drops of vodka to create a medium-bodied gold paint. Paint it around the cookie edges to finish. Allow the cookies to dry completely, 1 hour.
- Place dots of leftover flood royal icing on the images where appropriate (such as the center of a flower, or dotted patterns of the design). Use chef’s tweezers to apply gold dragees and sugar pearls. Allow them to dry until firm, 20 minutes.
- Package in cellophane bags tied with blue silk ribbon, or if making egg shapes as I have, arrange them in an Easter basket for after dinner take-away favors. Or use as table decorations at each place setting.
Notes
Meringue Powder: Not all meringue powder is the same. Be sure to read the directions on the back of the meringue powder container for suggested amounts.
Royal Icing with Egg Whites: If you don't have meringue powder on hand, you can still make the royal icing with egg whites. See my Conversation Heart Cookies recipe for the ingredients, and double the amounts for this recipe.
Tried this recipe?Let us know how it was!